Welcome back to the trail, fellow crafters! Today, we are taking The Scenic Route to explore one of my absolute favorite design elements: interactivity.
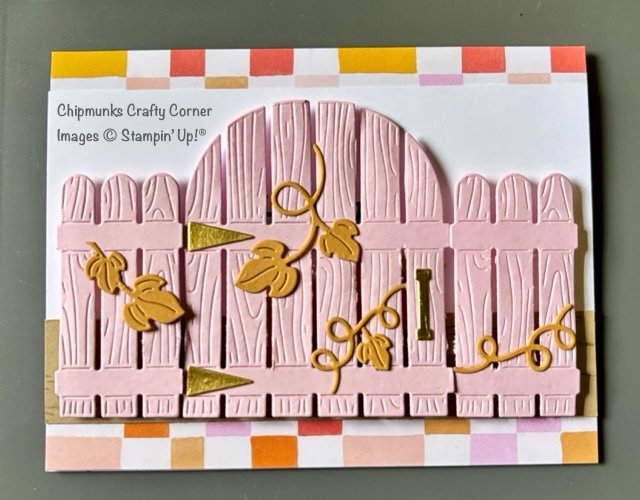
There is nothing quite like the joy of handing someone a card and watching their face light up when they realize it moves. Today, we are building a sweet, country-rustic card featuring a pretty pink garden gate that actually swings open to reveal a hidden autumn pumpkin patch inside! This design looks intricate, but I promise you it comes together easily with just a few quick passes through your die-cutting machine.
Grab a warm drink, step up to the crafting table, and let’s make it together!
 Inside the Supply Basket
Before we start chopping and scoring, here is what you will need from your stash. All stamps, dies, cardstock, and inks featured in today’s project are from Stampin’ Up!®
- Ink: Crumb Cake Classic Stampin’ Pad & Secret Sea Classic Stampin’ Pad
- Tools: Paper trimmer (with scoring blade or separate scoring board), Mini Glue Dots, Stampin’ Dimensionals / Foam Tape, and strong adhesive tape (like Tear & Tape).
- Pink Cardstock: 5-1/2″ x 8-1/2″ card base (scored at 4-1/4″), plus extra to die-cut two Painted Pumpkins fences and one gate piece.
- Crumb Cake Cardstock: 1″ x 5-1/2″ panel
- Golden Glow Cardstock: Scrap for six vine Painted Pumpkins die cuts
- Calypso Coral Cardstock: Scrap for two pumpkin die cuts
- Cajun Craze Cardstock: Scrap for one pumpkin die cut
- Gold Foil Sheet: Scrap for the gate hinge & handle
- Basic White Cardstock: 3″ x 5-1/2″ panel (front scene), and a 4″ x 5-1/4″ panel (inside the card)
- Painted Patch Designer Series Paper (DSP): 4-1/4″ x 5-1/2″ panel (Gingham Side for the background), and a 1/2″ x 5-1/4″ strip (for the inside card decoration)
 Step-by-Step Instructions
- Prepare the Background: Adhere the 4-1/4” x 5-1/2” panel of checkered gingham patterned paper to the front of your pink card base using liquid glue or strong adhesive tape.
- Create the Horizon: Secure the 3” x 5-1/2” panel of Basic White cardstock horizontally slightly above the center of the card front.
- Ground the Scene: Stamp the dirt ground image from the Painted Pumpkins stamp set in Crumb Cake ink across your 1” x 5-1/2” panel of Crumb Cake cardstock. Adhere this stamped ground panel across the bottom of the card base, overlapping the bottom of the white cardstock.
- Die-Cut the Elements: Die-cut your pink cardstock using the gate and fence dies. Next, die-cut your Golden Glow cardstock using the vine dies. Tip: Apply an Adhesive Sheet to the back of the Golden Glow cardstock before cutting to make adhering the delicate vines a breeze!
- Assemble the Hinge: Align the left post of your gate piece with one of the stationary fence posts. Join them together from the back side using a strip of strong adhesive tape. This creates a flexible cardstock hinge, allowing the gate to lift up and fold back easily.
- Mount the Fence: Apply foam dimensionals to the backs of your stationary fence posts to add beautiful depth, making sure not to put any adhesive under the gate door itself. Mount the fence pieces onto the card front, positioning the second fence post just to the right side of the gate so it nests perfectly when closed.
- Add Foliage: Attach the die-cut vines onto the fence and gate using mini glue dots or your adhesive sheet backing.
- Gild the Hardware: Apply an adhesive sheet to the back of a small scrap of Gold Foil sheet. Die-cut the hinges and gate handle. Press them firmly onto your pink gate.
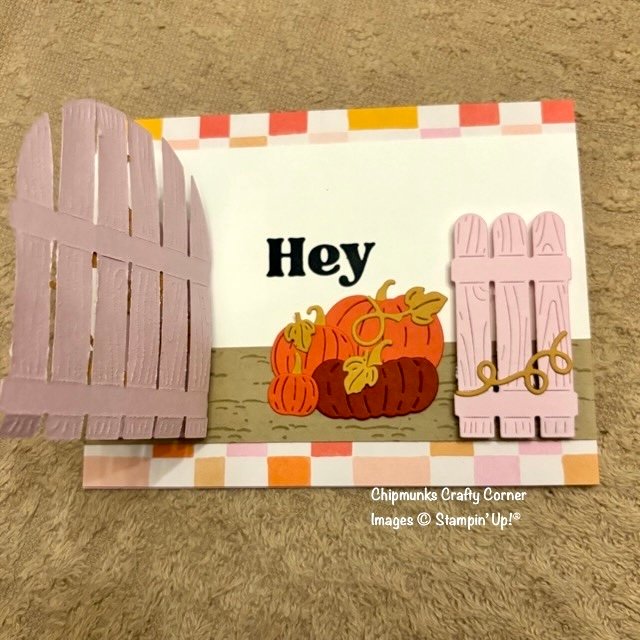
- Plant the Pumpkin Patch: Die-cut the remaining pumpkins, stems, and leaf vines out of Calypso Coral, Golden Glow, and Cajun Craze cardstock. Gently fold back your gate to see where it clears, then arrange and adhere the pumpkin cluster directly onto the white card background so they are beautifully hidden when the gate is shut.
- Stamp the Greeting: Stamp the “Hey” sentiment directly onto the Basic White background in Secret Sea ink just above the pumpkins.
 Open, Swing, and Smile!
When your recipient lifts up and folds back the gate, it magically reveals the hidden autumn pumpkin patch scene tucked underneath. It is clean, it is pretty, and it is full of whimsical charm!
Until our next stop on the trail,
Happy exploring!
Tanya 

 Burrow Inspiration Note
I completely CASED this clever interactive gate layout created by the incredibly talented Stamp With Amy K! I fell completely in love with her concept but wanted to put a unique Chipmunks Crafty Corner spin on it. For my version, I flipped over the pumpkin-patterned paper and used the colorful country gingham side found in that exact same double-sided Painted Patch Designer Series Paper (DSP) pack. I also picked a fresh, soft pink palette for my swinging garden gate. That’s the best part of cardmaking —taking a wonderful spark of inspiration, casing a beautiful design, and adding your own personal touch!